


![Image [1]-DIY Drone: A Complete Guide to Building Your Own Drone with MSOEN Technology-msoen](https://www.msoen.com/wp-content/uploads/2026/03/20260306074131355-1000020857.jpg)
![Image [2]-DIY Drone: A Complete Guide to Building Your Own Drone with MSOEN Technology-msoen](https://www.msoen.com/wp-content/uploads/2026/03/20260306074023827-1000020858-1024x882.jpg)
![Image [3]-DIY Drone: A Complete Guide to Building Your Own Drone with MSOEN Technology-msoen](https://www.msoen.com/wp-content/uploads/2026/03/20260306074023820-1000020862.jpg)
![Image [4]-DIY Drone: A Complete Guide to Building Your Own Drone with MSOEN Technology-msoen](https://www.msoen.com/wp-content/uploads/2026/03/a477fd3c6e011114-1024x768.jpg)
![Image [5]-DIY Drone: A Complete Guide to Building Your Own Drone with MSOEN Technology-msoen](https://www.msoen.com/wp-content/uploads/2026/03/f909e73179010958-1024x768.jpg)
![Image [6]-DIY Drone: A Complete Guide to Building Your Own Drone with MSOEN Technology-msoen](https://www.msoen.com/wp-content/uploads/2026/03/20260306074023184-1000020861-1024x768.jpg)
![Image [7]-DIY Drone: A Complete Guide to Building Your Own Drone with MSOEN Technology-msoen](https://www.msoen.com/wp-content/uploads/2026/03/2f0e2850cf010957.jpg)
![Image [8]-DIY Drone: A Complete Guide to Building Your Own Drone with MSOEN Technology-msoen](https://www.msoen.com/wp-content/uploads/2026/03/9cb94eafc3010937-1024x847.jpg)
The popularity of drones has grown rapidly over the past decade. From aerial photography and agriculture to mapping and recreational flying, drones have become one of the most exciting technologies available today. While many people choose to purchase ready-made drones, building a DIY drone offers a unique opportunity to understand how drones work and customize them according to personal needs.
A DIY drone project allows hobbyists, engineers, and technology enthusiasts to experiment with different components such as motors, flight controllers, propellers, and batteries. By assembling your own drone, you gain deeper knowledge about aerodynamics, electronics, and software control systems.
With reliable components from MSOEN, building a DIY drone becomes easier and more efficient. MSOEN focuses on high-quality drone parts and innovative technology, helping drone builders create powerful, stable, and customizable UAV systems.
This guide will walk you through everything you need to know about building your own drone—from understanding the basic components to step-by-step assembly and flight testing.
Understanding the Basics of a DIY Drone
Before starting your DIY drone project, it is important to understand how drones function. A drone, also known as an Unmanned Aerial Vehicle (UAV), is essentially a flying machine controlled remotely or through autonomous software.
Most DIY drones follow the quadcopter design, which uses four motors and propellers to achieve lift and movement. Each component plays a critical role in maintaining balance, stability, and flight control.
The four main flight movements include:
Throttle – Controls altitude by increasing or decreasing motor speed.
Yaw – Rotates the drone left or right.
Pitch – Moves the drone forward or backward.
Roll – Tilts the drone sideways to move left or right.
Advanced drone systems developed with MSOEN technology often integrate intelligent flight algorithms, GPS modules, and enhanced stability systems, making DIY drones more powerful and reliable.
Essential Components for Building a DIY Drone
Building a DIY drone requires several key components. Each part contributes to the drone’s overall performance and flight capability.
1. Drone Frame
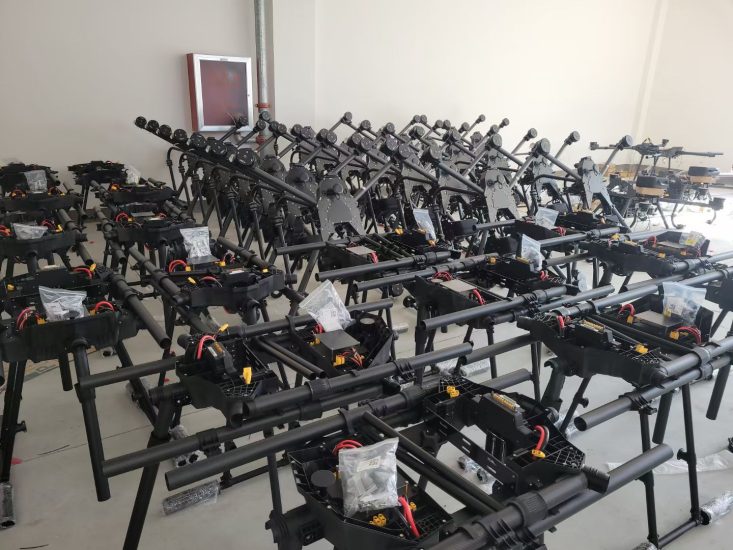
The drone frame acts as the skeleton of the drone. It holds all components together and determines the size and strength of the drone.
Frames are commonly made from materials such as:
- Carbon fiber
- Aluminum
- Plastic composites
A high-quality frame from MSOEN ensures durability while keeping the drone lightweight. Carbon fiber frames are particularly popular among DIY builders because they offer excellent strength without adding excessive weight.
2. Motors
Drone motors generate the thrust required for flight. Most DIY quadcopters use brushless motors, which are more efficient and durable than brushed motors.
The motor size and power determine how much lift the drone can produce. Larger motors provide stronger thrust but also require larger propellers and more powerful batteries.
MSOEN motors are designed for high efficiency and smooth performance, making them suitable for both beginners and professional drone builders.
3. Electronic Speed Controllers (ESC)
Electronic Speed Controllers regulate the speed of each motor. They receive signals from the flight controller and adjust motor rotation accordingly.
High-quality ESCs ensure smooth acceleration and accurate control during flight. Poor ESC performance can cause instability or delayed responses.
MSOEN ESC systems are optimized for fast signal processing and reliable power distribution.
4. Flight Controller
The flight controller is the brain of the drone. It processes data from sensors and controls the motors to maintain balance and stability.
Modern flight controllers include sensors such as:
- Gyroscopes
- Accelerometers
- Barometers
- GPS modules
These sensors allow the drone to maintain stable flight even in changing environmental conditions.
MSOEN flight controllers provide advanced stabilization algorithms and user-friendly configuration options.
5. Propellers
Propellers convert motor rotation into lift. They play a critical role in flight efficiency and maneuverability.
Propellers come in different sizes and materials, including plastic, carbon fiber, and reinforced composites.
Choosing the correct propeller size is essential for balancing thrust and power consumption.
MSOEN propellers are engineered for optimal aerodynamic performance and durability.
6. Battery
Drone batteries provide the energy needed for flight. Most DIY drones use Lithium Polymer (LiPo) batteries due to their high energy density and lightweight design.
Battery capacity directly affects flight time. Larger batteries offer longer flight duration but increase the drone’s weight.
MSOEN battery systems are designed to deliver stable power output and improved flight endurance.
7. Remote Controller and Receiver
The remote controller allows the pilot to control the drone manually. It communicates with the receiver installed on the drone.
Modern controllers may include features such as:
- Long-range communication
- Telemetry data
- GPS integration
- Camera control
MSOEN communication modules provide stable signal transmission for reliable drone operation.
Step-by-Step Guide to Building a DIY Drone
Building a drone may seem complicated at first, but following a structured process makes the task much easier.
Step 1: Assemble the Frame
Start by assembling the drone frame according to the manufacturer’s instructions. Make sure all arms and mounting plates are securely attached.
A stable frame ensures proper weight distribution and reduces vibration during flight.
Step 2: Install the Motors
Attach the motors to the ends of the frame arms. Ensure that each motor is securely fastened with appropriate screws.
Motor orientation is important because some motors rotate clockwise while others rotate counterclockwise.
Step 3: Mount the ESCs
Connect each motor to its corresponding Electronic Speed Controller. ESCs are usually mounted along the drone arms or near the center plate.
Proper wiring and insulation are essential to prevent electrical issues.
Step 4: Install the Flight Controller
Place the flight controller at the center of the frame to maintain balance. It should be mounted using vibration-dampening pads.
After installation, connect the ESC signal wires and sensor modules.
MSOEN flight controllers provide clear labeling to simplify wiring connections.
Step 5: Connect the Power Distribution System
The power distribution board distributes electricity from the battery to the ESCs and other components.
Ensure that all connections are properly soldered and insulated.
Step 6: Install the Receiver and GPS Module
Attach the receiver to communicate with the remote controller. If your drone includes GPS functionality, install the GPS module on top of the frame to ensure strong satellite signals.
MSOEN GPS systems improve navigation accuracy and enable advanced flight modes.
Step 7: Attach the Propellers
Install the propellers after completing all electrical connections. Make sure each propeller matches the correct motor rotation direction.
Incorrect propeller placement can prevent the drone from taking off.
Testing and Calibration
Before your first flight, calibration is essential. This step ensures that all sensors and control systems function correctly.
Important calibration steps include:
- Accelerometer calibration
- ESC calibration
- Radio transmitter configuration
- GPS signal verification
MSOEN flight systems often include automated calibration features that simplify the setup process.
Safety Tips for DIY Drone Builders
Building and flying a drone requires careful attention to safety.
Key safety recommendations include:
- Always test drones in open areas
- Keep propellers away from people
- Check battery voltage before flight
- Inspect components regularly
- Follow local drone regulations
Using high-quality components from MSOEN can significantly reduce the risk of hardware failure.
Advantages of Building Your Own Drone
DIY drones offer several benefits compared to ready-made drones.
Customization
You can choose components based on your specific needs, whether for racing, aerial photography, or research.
Cost Efficiency
DIY drones can often be built at a lower cost than purchasing high-end commercial drones.
Learning Experience
Building a drone helps you understand aerodynamics, electronics, and programming.
Upgrade Flexibility
DIY drones allow easy upgrades, including better cameras, stronger motors, or improved GPS modules.
MSOEN components are designed to support modular upgrades, making future improvements simple.
Future of DIY Drone Technology
DIY drone technology continues to evolve rapidly. New innovations include:
- AI-powered flight control
- Autonomous navigation
- Smart obstacle avoidance
- Enhanced battery efficiency
Companies like MSOEN are pushing the boundaries of drone technology by developing smarter and more efficient UAV systems.
As drone technology advances, DIY builders will gain access to increasingly powerful tools and components, allowing them to create professional-grade drones from home.
Conclusion
Building a DIY drone is both an exciting and rewarding project. It allows you to explore the mechanics of flight, experiment with advanced technology, and create a drone tailored to your personal needs.
By understanding the essential components—such as frames, motors, ESCs, flight controllers, and batteries—you can successfully build and operate your own drone.
With reliable components from MSOEN, DIY drone enthusiasts can achieve greater performance, stability, and innovation in their UAV projects.
Whether you are a beginner exploring drone technology or an experienced builder seeking new challenges, the world of DIY drones offers endless opportunities for creativity and discovery.


No comments yet